
Dual 10G SFP+. Enterprise power, desktop size.
The MS-A2 is a professional-grade mini workstation launched by Minisforum in April 2025. With a volume of just 1.78 liters (196 × 189 × 48 mm) and a weight of approximately 1.4 kg, it emphasizes high performance, a compact form factor, and robust enterprise-grade networking capabilities. The system is available with four different CPU options, though the Ryzen 9 7945HX variant has now been largely discontinued, leaving three configurations still on the market.
MS-A2 · Mini Workstation
⚡ Dual 10G SFP+ · Dual 2.5GbE · PCIe x16 · Up to 96GB DDR5 · 3x M.2/U.2
🔽 Select CPU model
Based on official EU store (minisforumpc.eu)
✨ Loading available configurations...
※ Official configurations and pricing reference from minisforumpc.eu (duties included, 30‑day local returns).
• All MS‑A2 models share the same chassis: 1.78L, dual 10G SFP+ (Intel X710), dual 2.5GbE LAN, PCIe 4.0 x8 slot, 3× M.2 slots (supports U.2 enterprise SSD), up to 96GB DDR5.
• Barebone = no RAM, no SSD, no OS. Additional memory/storage can be configured independently.
• All MS‑A2 models share the same chassis: 1.78L, dual 10G SFP+ (Intel X710), dual 2.5GbE LAN, PCIe 4.0 x8 slot, 3× M.2 slots (supports U.2 enterprise SSD), up to 96GB DDR5.
• Barebone = no RAM, no SSD, no OS. Additional memory/storage can be configured independently.
The MS-A2 has gained significant popularity within virtualization communities such as Proxmox and ESXi.
User reports highlight the following capabilities of the MS-A2:
- It runs Proxmox VE stably and supports IOMMU passthrough for both network controllers and the integrated GPU.
- Some users have built Proxmox clusters using multiple MS-A2 units, paired with Ceph storage and 25 GbE networking.
- It is well-suited as an All-in-One home server, capable of running multiple virtual machines for routing, NAS, media serving, and other applications simultaneously.
This article outlines a setup approach tailored for individual users.
Getting the 10 Gbit SFP+ Port Working in Proxmox:
Connect a DAC (Direct Attach Copper) cable from a 10 Gbit SFP+ port on your switch to one of the two SFP+ ports on your Minisforum MS-A2.
After connecting the cable, Proxmox may not recognize the new interface immediately. You need to restart the networking service.
You can do this in two ways:
- Restart the entire Proxmox host (results in downtime).
- Reload the network interfaces without a reboot
> Log in to the Proxmox web interface
> Select your Proxmox node: Proxmox -> Proxmox Node to select-> >_ Shellifreload -a
- In the Proxmox web interface, navigate to your node -> System -> Network.
- Check for a new network device. Its status should show Active: Yes. The device name (e.g., enp5s0f0np0) will depend on your system.
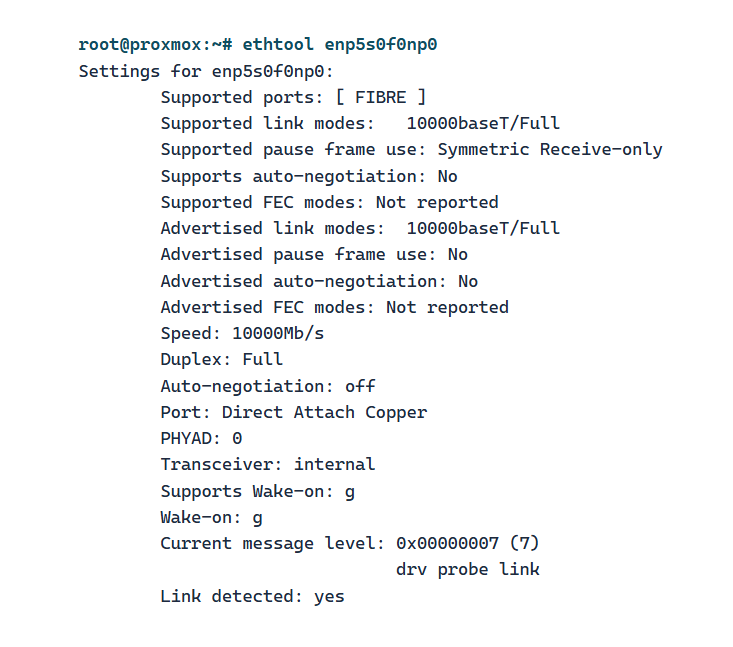
- For more detailed verification, use the ethtool command in the shell, replacing enp5s0f0np0 with your device name.
The key outputs to look for are:
- Supported ports: [ FIBRE ]
- Speed: 10000Mb/s
- Link detected: yes
At this point, the physical link is up, but Proxmox is not yet routing traffic through it. You need to edit the main network bridge (vmbr0) to use the new SFP+ interface instead of the original RJ45 port.
- In the Proxmox web interface, go to your node -> System -> Network.
- Select vmbr0 and click Edit.
- In the Bridge ports field, replace the existing interface name (e.g., enp3s0) with the name of your active SFP+ port (e.g., enp5s0f0np0).
- Click OK.
- Click Apply Configuration. Warning: This will briefly interrupt the network connection. Ensure you have entered the interface name correctly. An error here will require physical access to the host to fix the configuration.
- After the configuration applies, the Proxmox host will be connected via the 10 GbE SFP+ port using the same IP address as before.
- You can verify the connection in your switch's management interface or by checking the link speed in the Proxmox network device overview.
For quick reference, the main commands used in the process are:
| Task | Command / Path |
|---|---|
| ▶ Restart networking | ifreload -a |
| ▶ Check link status | ethtool <interface_name> |
| ▶ Change bridge interface | Proxmox GUI: Node → System → Network → vmbr0 → Edit → Bridge ports |
⚡ Note: After modifying the Bridge ports, click Apply Configuration to take effect.
This article is republished from the website